10 Essential Video Editing Tips for YouTube Success in 2026
Unlock channel growth with these 10 actionable video editing tips for YouTube. Learn to boost retention, improve CTR, and streamline your workflow today.
In the competitive landscape of YouTube, high-quality content is non-negotiable, and the real magic often happens in the edit. Effective video editing is not just about stringing clips together; it is a strategic process that directly influences viewer retention, audience engagement, and overall channel growth. Moving beyond generic advice, this guide provides a comprehensive roundup of professional video editing tips for YouTube creators looking to gain a tangible advantage.
This article delves into the specific, actionable techniques that separate successful channels from the rest. We will explore everything from the nuances of color grading for thumbnail consistency to the strategic pacing of B-roll that keeps viewers hooked. You will learn how to optimize jump cuts, implement engaging text overlays, and master audio design for a truly professional polish.
We will also cover advanced strategies, such as creating dynamic moments specifically engineered for high-performing thumbnails and perfecting your intro to maximize viewer retention from the first second. Each tip is broken down into practical steps you can implement immediately, transforming your raw footage into polished, compelling videos. These are the editing techniques that not only captivate your audience but also align with the metrics that drive YouTube's algorithm. Let's dive into the secrets that will elevate your content and set your channel up for sustained success.
1. Master the Art of Color Grading for Thumbnail Consistency
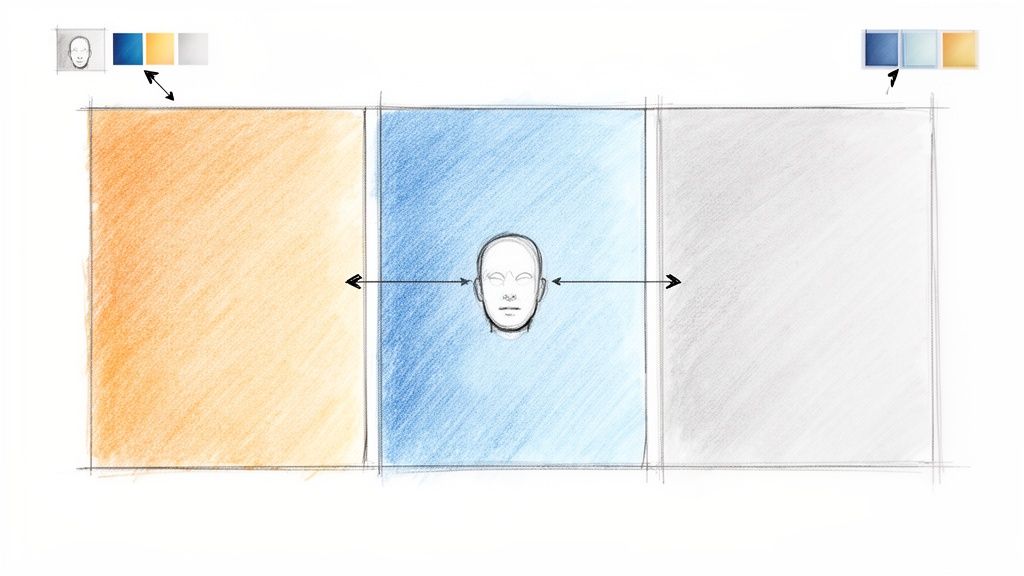
Your channel's visual identity is a critical component of brand recognition, and it begins with color. Color grading isn't just about making your video look cinematic; it's a strategic tool for creating a cohesive experience that extends from your thumbnail right into your video content. This practice establishes a recognizable aesthetic, helping viewers instantly identify your content in a crowded subscription feed.
When the colors in your thumbnail perfectly match the visual tone of the video, it builds viewer trust and sets clear expectations. This consistency is a hallmark of professional video editing tips for YouTube because it signals quality and attention to detail, which can significantly boost click-through rates (CTR).
Why It Works: Examples from Top Creators
Successful creators understand this principle well. Marques Brownlee (MKBHD) employs a crisp, cool color grade in his tech reviews, an aesthetic that is mirrored in his minimalist thumbnails, often featuring a signature red or black. Similarly, MrBeast utilizes warm, slightly desaturated tones that are consistent across both his high-energy videos and his eye-catching thumbnails. This synergy makes their content instantly recognizable.
Actionable Tips for Implementation
To apply this technique to your own content, follow these specific steps:
Create 2-3 Presets: Develop a few core color grading presets (LUTs or custom settings) in your editing software. Having a "main" look, a "dramatic" look, and a "vlog" look gives you flexibility while maintaining brand consistency.
Test on Multiple Devices: Check your color grade on a laptop, a phone, and a TV. Colors can appear drastically different across screens, and you want to ensure a consistent experience for all viewers.
Emphasize Key Tones: Grade your video to emphasize the primary colors you plan to use in your thumbnail. If your thumbnail will feature a vibrant blue, make sure the blues in your video pop without looking unnatural. This is a crucial step if you want to make great YouTube thumbnails that feel authentic to the video's content.
Moderate Saturation: Avoid pushing colors to their absolute extremes. Overly saturated or heavily stylized grades can be distracting, especially when they distort skin tones in both the video and the small format of a thumbnail.
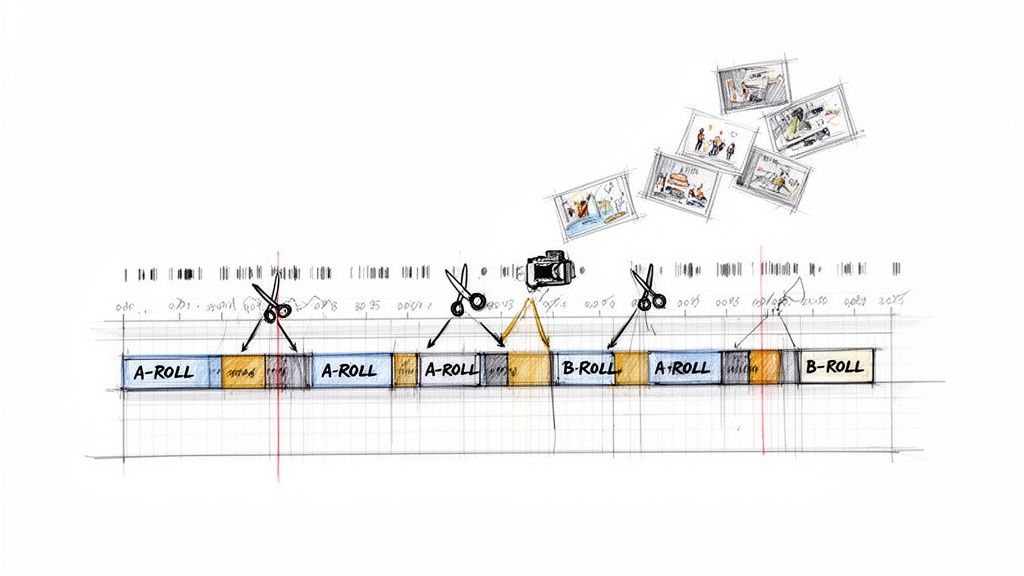
2. Strategic Use of B-Roll and Cut Pacing for Visual Engagement
B-roll is the supplementary footage that breathes life into your main narrative (the A-roll), preventing visual monotony and keeping viewers hooked. The art lies not just in what B-roll you show, but in the pacing of your cuts. This rhythm directly impacts viewer retention and emotional engagement, making it one of the most powerful video editing tips for YouTube. For any creator, especially those with talking-head formats, mastering B-roll and pacing is the key to reducing audience drop-off.
Strategic cuts break up long monologues, illustrate complex points, and add a dynamic, professional polish that holds attention. When your cuts are timed perfectly to your script and audio cues, you create a seamless viewing experience that feels intentional and high-quality, encouraging viewers to watch longer and subscribe.
Why It Works: Examples from Top Creators
This technique is a staple of professional YouTube content. WIRED's interview series, for example, expertly uses B-roll to visualize the topics being discussed, cutting away from the speaker at precise moments to maintain a brisk pace. Likewise, Michael Stevens of Vsauce masterfully intersperses documentary-style footage and graphics between his talking-head segments, making dense scientific concepts feel engaging and fast-paced.
Actionable Tips for Implementation
To integrate this dynamic editing style into your workflow, focus on the following practical steps:
Follow the '3-Second Rule': Aim to change the visual element on screen every 3-5 seconds. This could be a cut to B-roll, a zoom-in on your face, or a graphic overlay. This simple rule forces a dynamic pace.
Cut on Action and Emotion: Time your B-roll cuts to land on peaks in the action or moments of emotional emphasis in your voice. This makes the edit feel motivated and impactful.
Synchronize Cuts to Music: Use the beat drops and rhythmic patterns in your background music as a guide for your cuts. This creates a satisfying, almost subconscious, sync between the audio and visuals.
Build a B-Roll Library: Create a library of supplemental footage organized by category (e.g., "desk setup," "typing on keyboard," "cityscape"). For those needing to expand their library, you can explore B-roll sourcing tools to maintain high visual quality and variety.
3. Optimize Jump Cuts and Transitions for Retention
Jump cuts are the backbone of modern YouTube pacing. These abrupt transitions, which remove pauses and filler words while keeping the speaker in frame, are essential for creating the fast, engaging content that the platform's algorithm rewards. By tightening the pacing and eliminating dead air, jump cuts directly improve key metrics like watch time and average view duration, signaling to YouTube that your content is valuable and worth promoting.
This technique has become the standard for vloggers, commentators, and educators because it respects the viewer's time and maintains momentum. A well-executed jump cut makes content feel more energetic and professional, keeping the audience locked in from one point to the next without a moment of boredom. This is one of the most fundamental video editing tips for YouTube for any creator looking to boost retention.
Why It Works: Examples from Top Creators
The power of this technique is evident across different YouTube niches. Logan Paul popularized an aggressive, high-energy jump cut style in his vlogs, creating a relentless pace that defined a new era of content. In the educational space, Andrew Huberman uses more moderate and deliberate jump cuts to condense complex information into digestible segments, maintaining clarity without sacrificing engagement. Similarly, Jared Bailey demonstrates how clean, almost invisible jump cuts can lend a polished and professional feel to talking-head videos.
Actionable Tips for Implementation
To effectively use jump cuts and transitions in your own videos, follow these specific steps:
Vary Your Cut Timing: Avoid making jump cuts at the same interval every time. Mix short, rapid-fire cuts (2-3 seconds) with slightly longer segments to create a more natural and dynamic rhythm that doesn't feel robotic.
Bridge Cuts with Audio: To smooth out a jarring visual jump, let the audio from the next clip start a fraction of a second before the video cuts. This audio bridge, or L-cut, creates a seamless transition that is easier for the viewer to follow.
Punch In for Emphasis: Instead of a simple jump cut, slightly zoom in or "punch in" on the shot after the cut. This adds visual variety and can be used to emphasize a key point, making the edit feel intentional rather than just a way to hide a mistake.
Add Subtle Sound Design: Reinforce your cuts with subtle sound effects. A soft "whoosh," a gentle "swoosh," or a quiet "click" can telegraph a transition to the viewer, adding a layer of polish and making the editing feel more professional and high-quality.
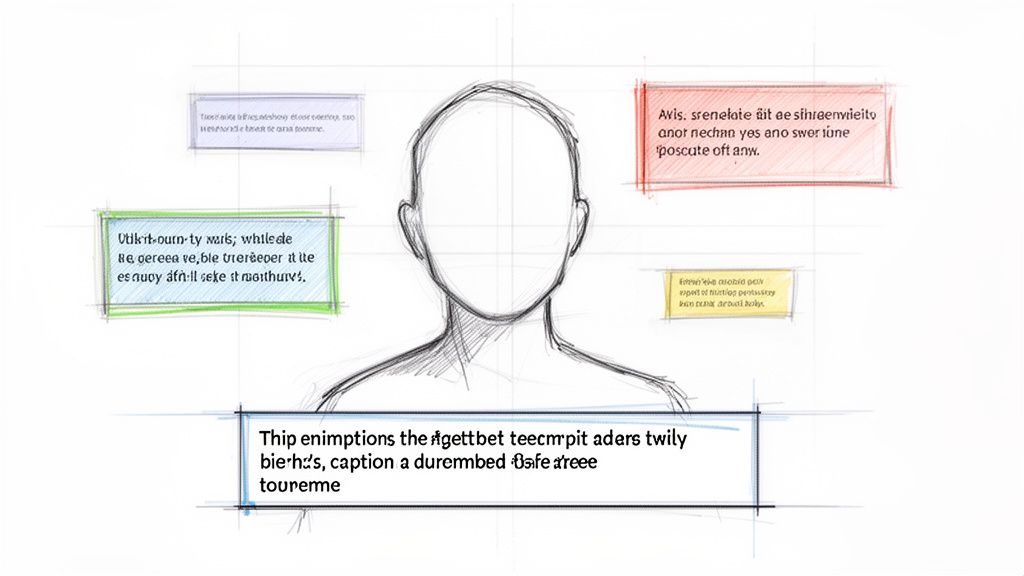
4. Implement Strategic Captions and Text Overlays for Accessibility and Engagement
Captions and text overlays are more than just a supplementary feature; they are powerful tools for accessibility, engagement, and information retention. Properly implemented, they make your content accessible to the deaf and hard-of-hearing community, a requirement for inclusive content on YouTube. Beyond accessibility, they cater to the majority of viewers who watch videos with the sound off, especially on mobile devices.
Strategically placed text overlays can highlight key takeaways, introduce speakers, or add humorous context, guiding the viewer’s attention exactly where you want it. This dual-purpose approach not only broadens your audience but also increases comprehension and view duration, as studies show videos with captions have significantly higher completion rates.
Why It Works: Examples from Top Creators
Creators in the educational and informational space master this technique. TED-Ed uses elegant, animated text to reinforce complex ideas, making them easier to digest. Similarly, Kurzgesagt integrates animated text so seamlessly into their animations that it becomes part of the storytelling itself. Even in interview formats, like those produced by WIRED, captions serve both for accessibility and to emphasize a poignant or powerful quote from the speaker.
Actionable Tips for Implementation
To effectively integrate captions and text into your videos, consider these professional video editing tips for YouTube:
Prioritize Readability: Use a clean, sans-serif font with high contrast. The industry standard is white text with a thin black outline or a semi-transparent dark background, which ensures visibility against any scene.
Use Auto-Captions as a Draft: Start with YouTube’s auto-captioning feature to save time, but always perform a manual review. Correct punctuation, spelling, and timing errors to ensure professional quality and accuracy.
Mind the "Safe Zone": Position essential text overlays and captions in the lower third of the frame. This prevents them from obscuring the speaker's face or critical visual information, keeping the primary subject as the focal point.
Keep It Concise: Limit on-screen text to one or two short lines at a time. This prevents overwhelming the viewer and allows them to read the text comfortably without pausing the video. For creators looking to streamline this process, exploring automatic caption generation can ensure consistency and save valuable editing time.
5. Use Parallel Editing and Multicam Techniques for Dynamic Storytelling
Long-form content like interviews, podcasts, and detailed tutorials can quickly become visually monotonous. Multicam and parallel editing are powerful techniques to combat viewer fatigue by introducing dynamic visual changes. Multicam editing involves switching between different camera angles of the same event, while parallel editing intercuts between two or more separate but related scenes, building tension or illustrating a comparison.
These professional video editing tips for YouTube are essential for maintaining audience engagement during extended conversations or complex demonstrations. By strategically cutting between angles or scenes, you create a more immersive and less static viewing experience, which directly contributes to higher audience retention.
Why It Works: Examples from Top Creators
This technique is a staple in modern YouTube content. The Joe Rogan Experience mastered the multicam interview, using seamless switches between a wide shot and close-ups of the host and guest to emphasize reactions and punctuate conversations. Similarly, WIRED's branded content, like their autocomplete interviews, uses multiple cameras to capture genuine reactions and present a polished, high-production-value feel that keeps viewers locked in.
Actionable Tips for Implementation
To apply this technique to your own content, follow these specific steps:
Establish a Cutting Rhythm: Don't switch angles randomly. Cut to a different camera to emphasize a key point in the dialogue, capture a non-verbal reaction, or transition to a new topic. This creates a natural, purposeful flow.
Color Match All Angles: Before you start editing, ensure color consistency across all your camera footage. Use your editing software's color matching tools or apply the same LUT to all clips to create a seamless visual experience when you switch between them.
Use Reaction Shots Strategically: A close-up of a guest's reaction is a perfect cutaway to hide a jump cut or break up a long monologue from the main speaker. These expressive shots also provide excellent source material for compelling YouTube thumbnails.
Leverage Match Cutting: Create a smooth, professional transition by "match cutting," where you connect two different angles using a similar visual element or action. For example, cutting from a wide shot of a hand gesture to a close-up of the same gesture creates a fluid, visually pleasing edit.
6. Master Audio Design and Sound Effects for Professional Polish
Many creators focus entirely on visuals, yet audio quality is often the primary reason a viewer will click away from a video. Mastering sound design isn't just about removing background noise; it’s about using audio to enhance emotion, direct attention, and give your content a truly professional feel. This practice involves layering background music, placing intentional sound effects (SFX), and mixing audio levels for ultimate clarity.
Poor audio can make even the most stunning 4K footage seem amateurish. In contrast, great sound design builds viewer trust and signals a high-quality production. This is one of the most impactful video editing tips for YouTube because it directly influences watch time and perceived value, making your content more engaging and authoritative.
Why It Works: Examples from Top Creators
Successful channels demonstrate the power of thoughtful audio. WIRED’s popular interview series, for example, uses subtle, clean sound design to emphasize key moments and maintain a sophisticated, focused pace. Linus Tech Tips maintains impeccably consistent audio levels across all their content, from unboxings to deep-dive explanations, ensuring the viewer is never distracted by sudden volume shifts. This consistency builds a reliable and professional viewing experience.
Actionable Tips for Implementation
To elevate your audio from an afterthought to a core feature, follow these specific steps:
Invest in a Quality Microphone: Your audio journey starts at the source. A decent USB or lavalier microphone is the most important hardware investment you can make for improving production quality. Clear raw audio is far easier to work with in post-production.
Use Audio Ducking: Automate the process of lowering background music volume whenever someone speaks. Most editing software has a built-in "ducking" feature that automatically adjusts levels, ensuring your voice remains the clear focus.
Choose Emotionally Resonant Music: Select background music that matches the emotional tone and pace of your video. A high-energy track works for a product reveal, while a lo-fi beat is better suited for a relaxed tutorial or vlog.
Apply SFX with Purpose: Use sound effects sparingly to add impact to on-screen graphics, transitions, or important moments. A subtle "whoosh" on a text reveal or a soft "click" can make your edits feel more dynamic and intentional.
Monitor Your Audio Levels: Keep your primary audio (dialogue) peaking between -6dB and -3dB. This industry standard ensures your audio is loud enough without clipping or distorting, providing a pleasant listening experience across all devices.
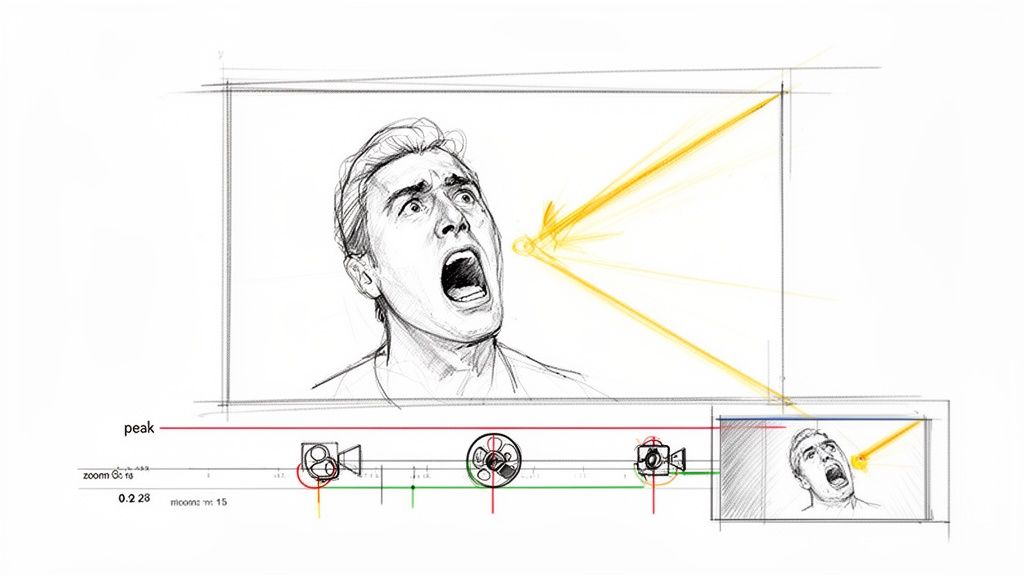
7. Create Dynamic Thumbnail-Optimized Cuts and Moments
Strategic editing goes beyond narrative flow; it involves deliberately creating high-impact moments specifically designed to become your thumbnail. Instead of searching for a usable frame after the edit is complete, this technique integrates thumbnail creation into the editing process. You are essentially engineering visual peaks: moments of extreme facial expression, shock, or high contrast that serve as perfect raw material for a high-click-through-rate (CTR) thumbnail.
This advanced approach bridges the gap between video editing and marketing, ensuring your final video contains several "hero shots" ready for promotion. These moments act as a visual promise of the excitement within the video, directly influencing a viewer's decision to click. By editing with thumbnails in mind, you make the final marketing step seamless and far more effective.
Why It Works: Examples from Top Creators
This strategy is a cornerstone of modern YouTube success. MrBeast is a master of this, structuring his videos around key reaction peaks that are perfectly framed and lit for thumbnail extraction. Similarly, creators like Pokimane often build segments that lead to a distinct moment of surprise or exaggerated reaction, which is then used to create a compelling, emotion-driven thumbnail. This synergy ensures the thumbnail accurately reflects the video's most engaging points.
Actionable Tips for Implementation
To apply this to your workflow, follow these specific video editing tips for YouTube:
Engineer 3-5 Visual Peaks: Intentionally edit several moments per video to have maximum visual impact. This could be a rapid zoom on a reaction, a freeze-frame on a shocking reveal, or a dramatic change in lighting.
Juxtapose Shot Types: Create contrast by cutting from a wide, establishing shot directly to a tight, expressive facial reaction. This dynamic shift not only enhances the viewing experience but also creates a powerful, thumbnail-worthy frame.
Time Your Expressive Moments: As you edit, place your most expressive facial reactions or visually interesting B-roll at 15 to 30-second intervals. This gives you multiple strong candidates throughout the video to choose from.
Collaborate with Your Designer: If you work with a thumbnail designer, export a few of these pre-planned peak moments for them. This provides high-quality source material and aligns your editing with the channel's marketing goals.
8. Perfect Your Intro and Outro Design for Hook and Retention
The first three seconds of your video are the most critical for audience retention. A powerful, fast-paced intro hooks viewers and signals to the YouTube algorithm that your content is engaging, while a strategic outro converts passive viewers into subscribers and encourages further watching. This two-part approach is a fundamental pillar of channel growth.
Effective intro editing establishes the video's value proposition immediately, preventing viewers from clicking away. Similarly, a clean and actionable outro provides a clear path for viewers to continue engaging with your content, boosting session watch time. Mastering both is one of the most impactful video editing tips for YouTube creators looking to build a loyal community.
Why It Works: Examples from Top Creators
The biggest names on YouTube have perfected this strategy. MrBeast famously uses intros lasting just one to two seconds, immediately establishing the video's high-stakes premise with a dramatic visual or statement. In contrast, Marques Brownlee (MKBHD) uses a consistent, minimal logo animation that reinforces his brand's sleek identity without wasting the viewer's time. This proves that whether you prioritize immediate action or brand recognition, brevity is key.
Actionable Tips for Implementation
To build effective intros and outros that boost retention, integrate these practices into your workflow:
Limit Intros to 1-3 Seconds: Modern viewers have short attention spans. Get directly to the content. A long, drawn-out intro is a primary reason for early audience drop-off.
Create a Visual Hook: Open with a compelling visual, an intriguing question, or a bold facial expression. This opening shot should be so captivating that it could also serve as the video's thumbnail.
Use Template Designs: Create reusable intro and outro templates in your editing software. This saves significant time and ensures brand consistency across all your videos with uniform music, logo placement, and calls-to-action.
Place CTAs Naturally: In your outro, guide viewers to subscribe or watch another video. Avoid generic "smash that subscribe button" phrases. Instead, suggest a relevant next video or ask a question to encourage comments.
9. Use Strategic Repetition and Recap Editing for Information Retention
For educational, commentary, or tutorial content, clarity is paramount. Strategic repetition is an editing technique that reinforces key information, ensuring your audience understands and retains the most important takeaways from your video. This involves more than just replaying a clip; it's about re-contextualizing a crucial point through edited variations or dedicated recap segments.
This practice is one of the most effective video editing tips for YouTube creators in the education space because it directly improves the viewer experience. By repeating a core concept, you prevent viewers from getting lost in complex topics, especially in longer videos. This not only boosts comprehension but also signals to the YouTube algorithm that your content provides substantial educational value, potentially improving its performance in search and recommendations.
Why It Works: Examples from Top Creators
This technique is a staple of high-quality educational content. Kurzgesagt masterfully uses animated recap segments to distill complex scientific ideas into memorable summaries before concluding their videos. Similarly, creators like Andrew Huberman often pause to verbally and visually review key findings before transitioning to a new topic, ensuring the audience is ready for the next piece of information. TED-Ed also frequently employs this method, using animation to recap the main arguments of a talk just before the final call to action.
Actionable Tips for Implementation
To effectively integrate this into your workflow, consider the following steps:
Reframe, Don't Replay: When repeating a visual point, avoid simply showing the exact same clip. Instead, change the framing, use slow-motion to add emphasis, or show it from a different B-roll angle.
Enhance with Graphics: Add new visual elements the second time a point is made. Use text overlays, animated arrows, or highlighted graphics to draw attention to the specific detail you want the audience to remember.
Create Dedicated Recap Segments: Before your video's conclusion or a major call to action, create a short, fast-paced segment that quickly summarizes the 1-2 most critical points. This acts as a powerful refresher.
Limit to Key Information: Be selective with what you repeat. Overusing this technique can feel redundant. Focus only on the foundational concepts that are essential for the viewer's understanding of the overall video.
10. Leverage Title Cards and Motion Graphics for Content Signposting
Title cards are static or animated graphics that identify video sections, acting as visual signposts that guide your audience through the content journey. When combined with motion graphics like animated text, icons, and custom transitions, they significantly increase the perceived production value of your videos. More importantly, they improve the information architecture, creating natural break points that are crucial for viewer retention and comprehension.
This technique is a cornerstone of professional video editing tips for YouTube, especially for educational content, tutorials, podcasts, and any multi-topic video. By clearly distinguishing between different segments, you help viewers follow along, find the information they need, and stay engaged for longer. This structured approach respects the viewer's time and makes complex information far more digestible.
Why It Works: Examples from Top Creators
This method is used by creators across many niches to enhance clarity and brand identity. TED-Ed uses elegant animated title cards to introduce new topics, making complex educational content feel structured and accessible. Linus Tech Tips frequently uses lower-third motion graphics to identify speakers, list product specs, and transition between benchmarks, providing a constant stream of organized information. Similarly, MKBHD's minimalist, tech-forward title cards perfectly match his overall brand aesthetic, reinforcing his channel's identity.
Actionable Tips for Implementation
To effectively use title cards and motion graphics in your own videos, follow these specific steps:
Create a Graphics Template Library: Design a set of reusable templates for title cards, lower thirds, and call-to-actions in your editing software or a program like Adobe After Effects. This ensures consistency and dramatically speeds up your workflow.
Keep Animations Quick and Smooth: Title card animations should be brief and impactful, typically lasting between 0.5 and 1 second. Anything longer can feel slow and disrupt the video's pacing.
Pair with Audio Cues: Enhance the impact of your visual signposts by pairing them with a subtle sound effect or a brief musical swell. This multisensory cue helps recapture a viewer's attention at the start of a new section.
Maintain Brand Cohesion: Use a consistent font, color palette, and animation style across all your graphics. This visual language should align with your channel art and thumbnail design to build a strong, recognizable brand.
Place Them Strategically: Insert title cards at natural section breaks, such as when you are transitioning from an introduction to the main topic or moving between different points in a list. Avoid placing them randomly, as this can confuse the viewer.
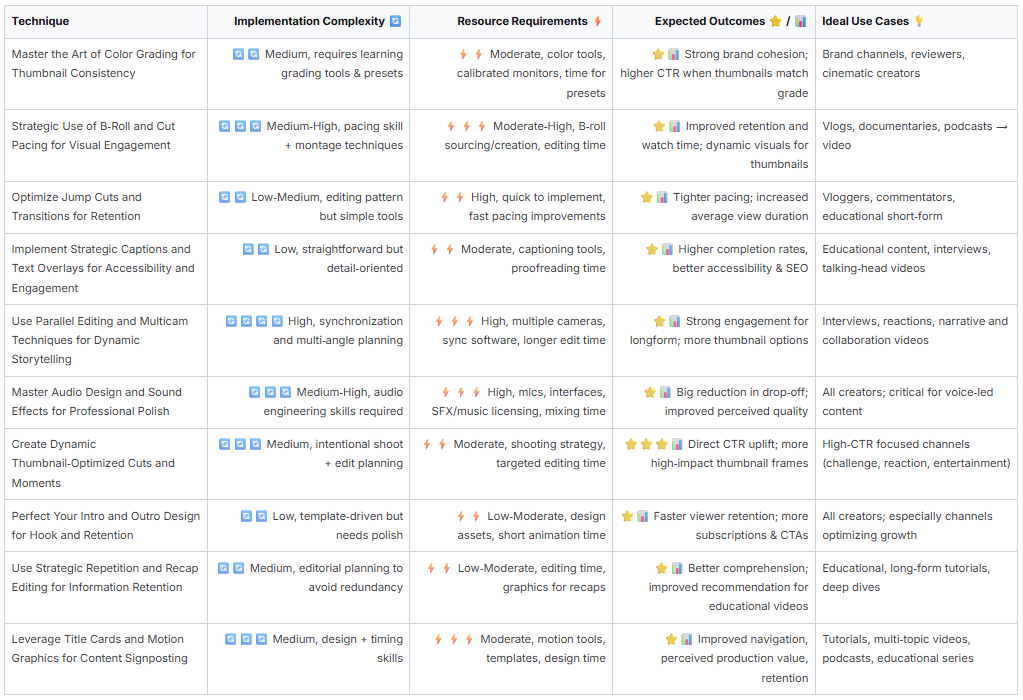
10-Point Comparison: YouTube Video Editing Tips
YouTube Video Editing Tips
Transform Your Edits into an Engine for Growth
We have explored a comprehensive suite of video editing tips for YouTube, moving far beyond the simple act of trimming clips. The journey from raw footage to a published video is a transformative process, and each technique we've discussed is a powerful tool in your creative arsenal. You now have a strategic framework for turning post-production into a primary driver of your channel's success. It is not just about making videos look good; it's about engineering them for engagement, retention, and growth.
Think back to the core principles we covered. Strategic B-roll and purposeful jump cuts are not just stylistic choices; they are your weapons against audience drop-off. Mastering audio design, from cleaning up dialogue to adding impactful sound effects, elevates the perceived quality of your content, building trust and authority with your viewers. Similarly, using color grading to create a consistent visual identity that links your video to your thumbnail is a sophisticated tactic that directly influences click-through rates.
From Tactics to Strategy: A Holistic Editing Mindset
The true power of these techniques is unlocked when you see them as interconnected parts of a larger strategy. Your goal is to create a seamless viewer experience where every element has a purpose.
Pacing and Retention: Your editing rhythm, dictated by cut pacing and dynamic transitions, directly controls the viewer's journey. Use this control to build suspense, clarify complex information, and maintain high energy levels.
Clarity and Accessibility: Strategic captions, title cards, and motion graphics are not afterthoughts. They are essential for guiding your audience, reinforcing key points, and making your content accessible to a broader audience, which YouTube's algorithm often rewards.
Brand and Authority: Consistent intro/outro design and a signature color palette help build a recognizable brand. When a viewer instantly knows they are watching one of your videos, you have successfully built a strong brand identity through editing.
Ultimately, the most impactful takeaway is this: every single decision you make on your timeline is an opportunity. It is an opportunity to hook a viewer, to clarify a point, to evoke an emotion, or to encourage a click. Adopting this mindset transforms editing from a technical task into a strategic creative process.
Your Actionable Path Forward
Mastery does not happen overnight. The key is consistent application and intentional practice. Do not try to implement all ten of these advanced video editing tips for YouTube in your very next project. Instead, choose two or three to focus on.
For your next video, perhaps you will concentrate entirely on perfecting your audio design and implementing strategic jump cuts. For the one after that, you might focus on creating thumbnail-optimized moments and mastering your color grading workflow. By isolating and practicing these skills, you will integrate them into your natural workflow much more effectively.
Remember, the goal is to build an intuitive understanding of how each editing choice affects your audience's experience and your video's performance metrics. Analyze your YouTube Studio data after applying a new technique. Did your audience retention improve? Did your click-through rate increase? Use this feedback loop to refine your approach, turning your editing suite into a laboratory for YouTube growth. Your timeline is not just a place to assemble clips; it is where you build your connection with your audience, one cut at a time.
Ready to bridge the gap between your final edit and a high-performing thumbnail? Many of the tips we discussed, like creating thumbnail-optimized cuts and mastering color grading, directly impact your CTR. Thumbnail Maker streamlines this critical final step, helping you leverage your best video moments to create stunning, clickable thumbnails in minutes. Visit Thumbnail Maker to see how you can turn your editing efforts into more views.
Explore 10 powerful YouTube thumbnail examples from top creators. Learn why they work and how to create your own to increase your channel's click-through rate.